
Interactive Procedures give your team a structured, step-by-step process to follow for safety, operational, maintenance, and compliance tasks. This guide walks you through creating one from scratch.
Step 1: Start a new Procedure
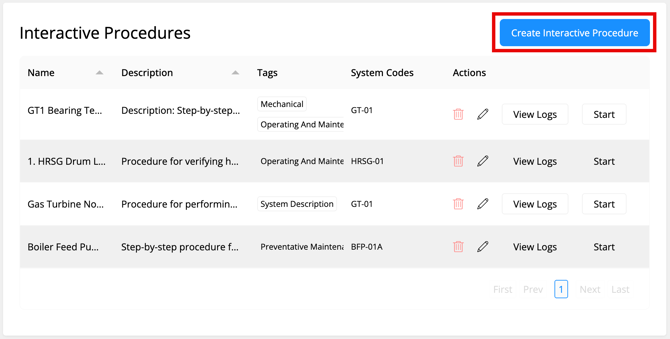
On the site navigation, click Procedures. Click Create Procedure to start a new one.
Step 2: Set up the Procedure
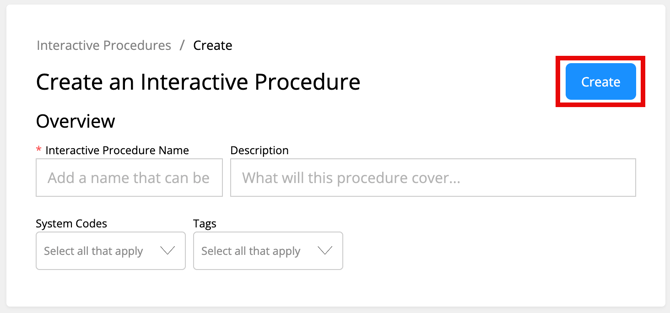
You'll need to fill in the following fields:
- Procedure Name — Use a human-readable name that's easy to recognize later.
- Description — Help differentiate this procedure from other similarly named ones.
- System Codes — Let technicians identify this procedure by equipment/system code. System Codes are created at the site level.
- Tags — Improve searchability using familiar single-word associations. For consistency across sites, Tags are created at the organization level.
Once you've filled this in, click Create.
Step 3: Create your first version
You will automatically be brought into the Interactive Procedure builder where you can start adding information and steps.
Step 4: Build out the Procedure
Use the grey circle with a + icon to add content — it turns blue on hover. This is the same universal block-insert pattern used throughout Preserve's creation tools.
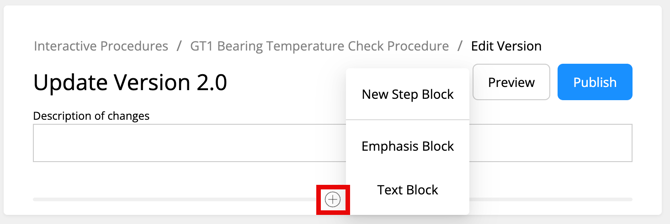
You can build a procedure using four block types:
New Step Block
Starts a brand-new top-level step in your procedure's checklist. Use this when you're beginning a new, distinct action in the sequence — not a continuation of the step before it. Like a Continue Step Block, you can:
- Request confirmation from the technician on the step
- Add helpful links specific to that procedure item
Continue Step Block
Adds a sub-step underneath the current step, rather than starting a new numbered step. Use this when an action is a continuation or breakdown of the step directly above it — for example, splitting a single action into smaller sequential sub-actions without jumping to the next major step number.
Emphasis Block
Use this to alert technicians with Notes, Cautions, or Warnings. Use it to call out specific information that needs extra attention.
Text Block
For general communication. Gives you a section label and an open text area — useful for context that isn't part of the step-by-step checklist itself.
Step 5: Preview and publish
Once your procedure is built, scroll to the top and click Preview (optional) to see how it will look once published.
If you're happy with the preview, click the X to return to the main creation page, then click Publish. Your Procedure is now live and ready for your team to use.
Related Articles
- What is an Interactive Procedure?
- Using an Interactive Procedure
- Procedure Best Practices
- Interactive Procedure Block Types [not yet written]
- Reviewing Interactive Procedure Logs