
Daily Rounds in Preserve replace pen-and-paper equipment checks with a structured, digital format that captures data, flags out-of-range values, and keeps a full history for your team. This guide walks you through building one from start to finish.
Step 1: Open Daily Rounds and start a new Round
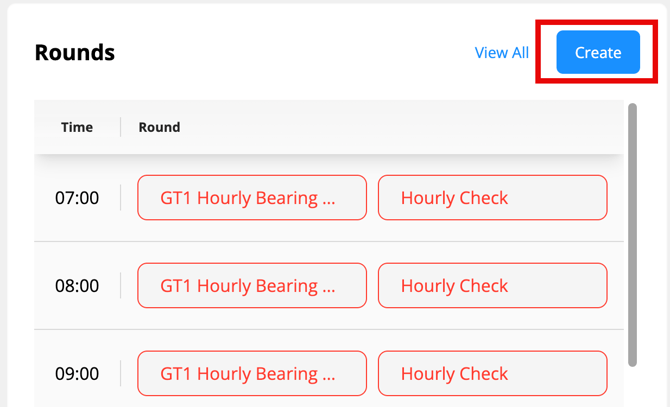
Navigate to Rounds from the top navigation menu, or select the Rounds module from your Home screen. Click Create.
Step 2: Set up the Round shell
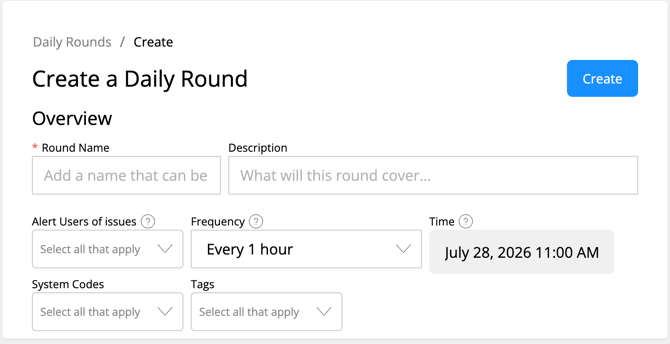
Think of this as the container that holds your Round and all its future versions. Fill in the following fields:
- Round Name — Give it a clear, recognizable name (e.g., "Water Treatment AM Round")
- Description — Briefly describe what this round covers or who it's for
- Alert Users — Select the team members who should be notified if a technician logs an out-of-range value
- Frequency — How often this round should be completed (e.g., daily, twice daily)
- Start Time — The time this round is scheduled to begin
- System Codes — Add relevant system codes
- Tags — Add tags for additional searchability
When you're done, click Create.
Step 3: Create your first version
Once the shell is created, you will automatically be brought into the Round builder, where you can start adding in round steps.
Step 4: Add content to your Round
You'll now see the Round builder. To add content, hover over the line break with the + icon — it will turn blue. Click it to insert a new block.
💡 Tip: This blue + icon is the universal add pattern used throughout Preserve's creation tools. You'll see it in Interactive Procedures and other builders too.
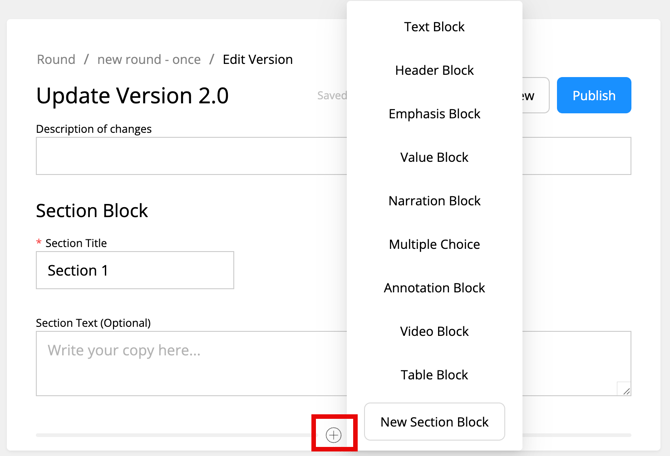
Choose the block type that fits what you need:
Text Block
Use this for instructions, context, or route descriptions. Technicians read this but don't interact with it — no input required.
Value Block
Use this when a technician needs to record a number from an instrument or gauge (pressure, temperature, flow rate, etc.). You can set a safe range for each value — if a technician logs something outside that range, the system will flag it immediately and alert the users you designated in Step 2. This is one of the most powerful features in Rounds.
Multiple Choice Block
Use this for status checks with predefined answers (e.g., "On / Off / Standby" or "Normal / Abnormal"). You can configure specific answers to trigger a flag if selected.
Narration Block
Use this for open-ended text input — sometimes called a "short answer" block. Great for observations, notes, or anything that doesn't fit a fixed format.
Emphasis Block
Use this to call out safety-critical information or warnings. Like the Text Block, technicians read this but don't interact with it. Use it sparingly so it stands out when it matters.
Add as many blocks as you need to fully cover the route. You can reorder blocks at any time by dragging them.
📖 Need a deeper look at each block type? See Creation Block Types for detailed examples and best practices.
Step 5: Publish the version
When your Round is built out, click Publish to make it active and available for technicians to complete on schedule.
Related Articles